Category Archives: Painting The Lazy Way

Painting The Lazy Way 2: Zuzzy Terra-Flex Mat

Introduction

Several months ago, I purchased a 3×3-foot Ruined Lands terrain mat from Zuzzy Miniatures. I also posted an out-of-the-box review, but didn’t get around to actually painting the mat until yesterday. So, this post is a continuation of the review as well as an opportunity to add another painting article to Chez Ebbles.

Photos

First, a couple of photos. (Click ’em to see the full size versions.)


I only used four colors, and the mat’s surface detail does most of the work.

Paints Used

  • Vallejo Game Color Charred Brown
  • Vallejo Game Color Earth
  • Vallejo Game Color Black
  • Vallejo Game Color Cold Grey

Painting Overview

  1. The entire mat was painted with a 1:1 mix of Charred Brown and water, using a large flat paintbrush. I used a whole bottle of Charred Brown in a disposable cup.
  2. Next, the mat was drybrushed gently with a 1:1 mix of Earth and water.
  3. Another drybrushing pass, with a bit more pressure, on random areas of the mat.
  4. A final heavy drybrushing pass on random areas of the mat, with special attention paid to the rocks and areas of dried/cracked soil.
  5. The burnt tree limbs and areas of charred undergrowth were painted with thinned-down Black.
  6. The burnt tree limbs and areas of charred undergrowth were drybrushed with a 1:1 mix of Black and Cold Grey.

The most important thing to remember: thin your paint! The 1:1 paint-to-water mix goes a much longer way than unthinned paint, and because acrylic paint is transparent to varying degrees, colors blend better when really thinned out. So, that first layer of Charred Brown and water serves to tint the dark gray latex of the mat to a deep, rich soily-brown color, and the first drybrushing pass brings out the surface relief nicely. The subsequent drybrushing passes serve to give the surface a nice, uneven variation in soil color.

The mat took me about 7-8 hours to do, but it was a fairly easy and undemanding task. I used one entire bottle of Charred Brown, less than a third of a bottle of Earth, and about the same amount of Black and Cold Grey as if I were painting a couple of 28mm figures.

Conclusion

Unpainted, the Zuzzy mat looks nice enough. Painted, even by a lazy painter like me, a Zuzzy mat completely blows every other gaming landscape solution out of the water. I can’t go back to fighting battles on Planet Green Cloth now, so you could say that I’ve been absolutely spoiled by the Zuzzy mat. Painting one is an easy task, but requires a fair amount of time, so a large Zuzzy mat would be a fun group project, even for unskilled painters. Draft some family members or invite some gaming buddies over, give each of ’em a nice big tank brush, assign them an individual area of responsibility, and you’ll have a finished mat in no time flat.

Painting The Lazy Way #1: Macragge Genestealers

Introduction

I used to be a good painter. When I was younger, I had the patience and motivation to try and make my figures look like they did in the glossy magazines and whatnot, and it wasn’t unusual for me to spend hours and hours on just one figure.

A decade later, I find myself much less interested in painting to an extremely high standard, and more interested in just getting the figures painted to a “good enough to play with” standard. Part of it is the fact that my eyesight and coordination aren’t what they used to be, part of it is a lack of time, and part of it is a simple refocusing of my interests from painting to playing. So, my painting style changed, with an emphasis on picking figures and color combinations that were quick and easy to paint.

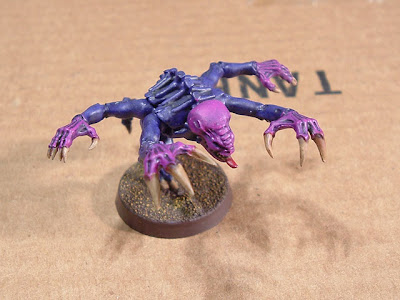
For this first installment, I chose figures that are incredibly easy to paint: the snap-fit Genestealers from the old Battle for Macragge starter set. The color scheme is based heavily upon the classic blue and purple Genestealer scheme from earlier editions of 40k, but I tweaked the palette slightly because blue and purple don’t look 100% harmonious to my eye. Instead, my Genestealers are a very dark cool purple that looks almost blue, and a lighter shade of warmer purple. The claws are also a slightly darker bone color, rather than the bright ivory of the “official” palette.

The reason the Genestealers are so easy to paint is because there are really only 3-4 areas of color, none of them are too fiddly to paint, and the colors used are easy to work with. The large amount of raised and inset surface detail on the figures also means they take washes and drybrushing very well, which speeds things up significantly.

The results are more than good enough to play with, but they’ll probably make hardcore painters cry, because my quality dial is set to “looks a little better than a prepainted plastic figure” instead of “makes the ‘Eavy Metal painters turn green with envy”.

Photos

The painted figures are shown below. Click on the photos to see them at full size.


As you can see, it’s a pretty basic color scheme, and the model’s surface detail does most of the work for you.

Paints Used

  • Vallejo Game Color Royal Purple
  • Vallejo Game Color Warlord Purple
  • Vallejo Game Color Earth
  • Vallejo Game Color Bone White
  • Vallejo Game Color Charred Brown
  • Vallejo Game Color Scrofulous Brown
  • Vallejo Game Color Dark Flesh
  • Vallejo Game Color Gory Red
  • Citadel Leviathan Purple Wash
  • Citadel Gryphonne Sepia Wash

Painting Overview

  1. The entire body, with exception of the head and hands, was painted Royal Purple.
  2. The head and hands were painted Warlord Purple.
  3. Leviathan Purple wash was applied liberally to the entire figure and allowed to dry.
  4. The main body was drybrushed with Royal Purple until smooth to the eye.
  5. The hands and head were drybrushed with Warlord Purple until smooth to the eye.
  6. The claws were painted with a 1:1 mixture of Bone White and Earth.
  7. The teeth were gently drybrushed with the 1:1 mix of Bone White and Earth.
  8. The tongue was painted with Dark Flesh, then highlighted with Gory Red on the top surface only.
  9. Gryphonne Sepia wash was applied to the claws and teeth, then allowed to dry.
  10. The base was flocked with sand and painted Charred Brown.
  11. The flocked portion of the base was drybrushed with Scrofulous Brown.

When drybrushing, make sure your paint is a little more watery than normal, and don’t be afraid to repeat the process until the blending looks relatively smooth. (Dry paint causes a chalky buildup.)

When drybrushing the teeth, touch them only with the tip of the brush, and gently drag in one direction only–from the back to the front. Repeat until the teeth pop out visually. (It’s easier to do than it sounds.)

Using the Citadel washes requires some faith on your part. Don’t worry about how hideous the model looks while the wash is still wet–when it dries, it will look like it’s supposed to. The drybrushing step simply restores shading definition and smooths out the blending a bit.

Conclusion

This color scheme is a homage to the classic Genestealers, but darker, more subtle, and much less garish than the brightly highlighted official scheme. Despite the number of steps involved, it’s easy to do, and the lack of fiddly details means you can get quite a lot of them finished in a short time.