Monthly Archives: July 2008

More Citadel Wash testing

Following up on the Citadel Washes review I posted a few days ago, I painted a couple of human figures to see how the Citadel Washes work on clothing and flesh.

2 Copplestone troopers and one of the bots from the review

(Now, I’m nowhere nearly as good a painter as I used to be in my youth, back when I could actually see what I was doing with the brush, so pardon the lack of eyes and absence of fancy highlighting.)

The fatigues are a 1:1 mix of Vallejo Caiman Green and Vallejo Khaki, while the boots, undershirts, weapons, and gear are a 1:1 mix of Vallejo Black and Vallejo Cold Grey. The fleshy bits are a 3:1 mix of Vallejo Dwarf Skin and Elf Skintone. The lady’s hair is Vallejo Scorched Brown, while the guy’s hair is Vallejo Beasty Brown. The fatigues and gear received a wash of Devlan Mud, while the exposed flesh and hair received a wash of Ogryn Flesh. I applied a coat of straight Future to seal the paint, and brushed on a layer of Vallejo Matte Varnish after the Future dried.

When I get some more air-drying clay, I’ll be blending the figures’ integral stub bases into the slottabases, then finishing the bases properly.

Citadel Wash Set Review

I mentioned in the Carnifex review that I had also purchased the new Citadel Wash Set, which comes with all 8 of the new washes. I had a chance to try them out earlier while painting up some Copplestone Castings Terminator Robots to use as security robots.

The washes, with a Vallejo Game Color 17ml bottle

The 8 colors, in order of usefulness, are: Devlan Mud, Badab Black, Ogryn Flesh, Gryphonne Sepia, Thraka Green, Baal Red, Asurmen Blue, and Leviathan Purple. They come in dinky little 12ml bottles that, at first blush, made me grumble a little about how it seems that every time Games Workshop comes out with a new line of paints, the bottles shrink and the prices grow. I popped open the lids, and was annoyed to see that the bottle design doesn’t significantly improve on the problems that the older flip top bottles had. I’m planning to transfer them to spare Vallejo dropper bottles, because I really don’t like flip top pots.
The next step was to paint something so I could give them a try. Since I needed the Copplestone robots for an upcoming game anyway, it was a good opportunity to kill two birds with one stone. I basecoated the robots in Vallejo Sombre Grey, then painted the weapons, shoulders, hip actuators, knee actuators, and the thigh piping a 1:1 mix of Vallejo Black and Vallejo Cold Grey. The same 1:1 mix of Black and Cold Grey was applied to the bases.

I had 5 robots finished, so I looked over the colors. I decided to use the Badab Black wash because I wanted a dark, slightly desaturated, and somewhat oily look to the robots. I basically just dipped the brush in the pot and glopped the stuff all over the figures, with the occasional pause to wick away the excess with the brush. This is the result:

Group shot: 5 Copplestone Castings Terminator Robots
Close-up shot

I was more than a little surprised at how easy the washes were to use. The consistency is quite a bit thicker than than I expected, they go on smoothly, and they settle down into the recesses nicely. Straight from the bottle, they do stain and darken colors significantly, so they would seem to work best with lighter shades of the colors you want to use. I think they would be terrific to use for beginners, or getting those boring figures that you have to paint a lot of out of the way quickly.

I don’t think advanced painters are going to get much out of these washes, especially if they’re already used to mixing their own washes and glazes. For beginners, though, they’re a good confidence builder, as the initial results are fairly tableworthy, and they can move on to layering and highlighting from there. Also, they dry pretty flat, as you can see in the photos. (The figures aren’t even varnished yet.)

My initial grumbling about the small quantity and flip top pots aside, I like these washes.

Update: More testing here.

Tyranid Carnifex Review

Introduction

My wife and I visited the local gaming store the other day just to pick up some dice I needed for a game. We walked out with a brick of green 12mm 6-sided dice, the new Citadel Wash set, and a Tyranid Carnifex. Heh. So much for just buying the dice.

I took a look inside the box last night, but didn’t have time to really get into it since I still had some work to finish. Today’s a light day for work, so I figured I’d take a poke at building the thing. Here are my impressions:

The size of this thing is unreal. I knew it was big, it looks big on the box, and it looks big in photographs. Seeing it in the flesh is something else…this thing is big. It towers over everything else I have by at least a good inch and a half, and that includes my Space Marine dreadnought and the Tau battlesuits. Here are some photos of the finished model:

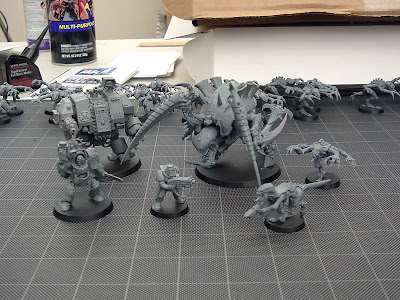
Group shot with my Space Marines and a couple other Tyranids

Same setup, Carnifex rotated for a side view

Box Contents

The box contains a glossy black and white instruction booklet, three sprues, and a 60mm base.

The first sprue contains 5 and a half 2-part heads, a pair of Devourer arms, a pair of Deathspitter arms, two large scythe arms, two decorative head bits, six carapace spikes, a spiked mace tail attachment, and a scything tail attachment.

By “5 and a half heads”, I mean five whole heads, with an optional damaged half that can replace the right side of the normal head. The normal head is pretty much just that, a huge version of the normal Tyranid head. The other 4 heads are: one with a pair of very prominent tusks, one with a giant dripping tongue that would do Gene Simmons proud, complete with a couple of scrotum-like venom glands hanging off the chin, another head with a gaping maw showing a bio-plasma weapon, and a strange head with two very prominent vane-like structures arranged like a pair of horns and three pairs of eyes.

The two decorative head bits are a blade-like protrusion that sort of looks like a rhinoceros horn in profile, and a ridged, V-shaped bony mass. Either one of them fits on the frontmost ridge of most of the heads.

The second sprue contains a 3-part upper torso, two giant crab pincer arms, three choices of carapace, a pair of legs, the lower torso, and half of the ball socket attachment that secures the lower torso to the upper torso.

The three carapaces included are: a smooth carapace, one with spore cysts, and one with spine banks.

The third sprue contains weapons and accessories. There are two smaller scything arms, a pair of Venom Cannon arms, a pair of Barbed Strangler arms, four spikey shoulder armor bits, a large Adrenal Gland biomorph bit, and some scrotum-like Venom Gland sacs that the instructions suggest gluing to the arms.

The Barbed Strangler arms come in three pieces. The right arm is holding the weapon, and the left arm is holding a giant sac filled with spheroid projectiles, which connects to the weapon with a long, meaty-looking hose. The third piece is a barrel half for the weapon itself. A cute touch is that you can see round bulges along the hose, which visually suggests projectiles being moved to the weapon from the sac.

The Venom Cannon arms come in two pieces. The right arm is holding the weapon, and the left arm has the fingers growing into a long tube that enter the weapon body on the left side.

The instructions also show several possible configurations and armament options for the model.

Build Notes

The lower body was pretty simple, only requiring that you glue the legs to the sides of the lower torso, glue the feet to the 60mm base, and then glue the hemispherical ball socket dealie onto the “waist” part. The legs are not posable, and use rectangular slots and tabs for fitting. I didn’t use any of the optional tail attachments.

The upper torso comes in two left-right halves, and a third upper center piece that fills the gap between the left and right halves. Building the upper torso was kind of like building one of these old ERTL USS Enterprise models from the 1980s–a little frustrating and requiring some clamping and a lot of cleanup work. The last part to go on is the carapace, and I chose the smooth carapace.

All of the heads assemble identically–just glue the halves together, glue on either of the two optional decorative bits, then glue the completed head into the neck socket. I chose to use the tusked head.

I still haven’t decided what arms to put on the thing, but they all connect to the torso by way of a ball at the shoulder and 4 sockets on the upper torso. Right now I’m leaning towards the large scythe arms to fill the two uppermost arm sockets, and I’m torn between giving it a pair of Deathspitters or using one of the larger weapons.

Conclusion

I really like this model. It’s big, it’s frightening, and because of the large number of included options, you have a lot of choice in how you want the thing to look. I feel like I got my money’s worth out of this model, which is a pleasant difference from how I felt about the Space Marine Terminators I reviewed a couple of months ago.

Update: I decided to use the 4 scythe arms and tool it up into a giant slashy stabby bitey endgame boss. I also took some photos for scale and added them to the entry.

The Tungsten Powder Experiment, Part 2

I’ve weighted the bases of all 18 Genestealers with the PVA and tungsten powder mix, and I have some additional observations to make.

First, I went to a drier, somewhat more crumbly mix that had a higher proportion of powder, and this mix is noticeably heavier. It’s also a bit messier while kneading, but still cleans up easily.

Second, I believe I’m down to about 70% of the original amount of powder after weighting 20 bases. I had some leftover putty that I didn’t want to waste, so I also weighted the bases of two of my other plastic figures. Once I run out of powder, I’ll post again with a final count of how many slottabases can be filled with one can of this stuff.

Third, the added amount of heft from the new mix is unbelievable. If you flip a Genestealer over just right, it’ll do a little ninja roll and snap back to its feet, which is kinda funny to watch.

Overall, I’d have to say that while this stuff works nicely, the normal price point of $20 USD per 8-ounce can is steep enough that I would only recommend it wholeheartedly if you have absolutely no access to #9-#12 lead shot in small quantities. If you can find the shot, go with that instead…it’ll be heavy enough, and if you’re lucky enough to know someone who loads their own shotgun shells, you might be able to buy a pound’s worth from that person at a better price.

If you’re in the same boat that I am (not knowing anybody that loads their own shells, and not keen on buying 25 pounds of shot for $50), then the tungsten powder is an acceptable alternative despite its price.

The Tungsten Powder Experiment


A few days ago, I was looking for ways to weigh down the bases of my plastic Tyranid Genestealer models. The main problem with them (and some of the other Tyranid models, such as the Hormagaunts) was that the base size wasn’t in proportion to the size of the figure. As a result, these models have a tendency to faceplant on angled surfaces, or be knocked over easily because their center of gravity is too high and too far away from the center of the base for optimum stability. So, the bases needed to be weighted somehow.

The nice thing about Games Workshop slottabases is that they’re hollow on the bottom, and that concavity is handy for filling with something heavy. The unslotted versions are very easy to weigh down–all you have to do is glue something like an US penny to the underside. The slotted version that my Genestealers came with, however, has walls that partition the concavity into three areas, so you’d have to saw the penny into odd-sized bits to fit within these “compartments”.

Now, I don’t know about you, but I have better things to do with my time than spending an hour defacing US Government property with a hacksaw and a vise just to keep my little plastic army men from falling over. My second instinct was to buy some small lead shot in the #9 to #12 range, and use cyanoacrylate gel to fix the shot into place.

After 20 minutes of consulting with Professor Google, I came to the conclusion that spending $50 for a giant sack of lead shot was something of a non-starter, as I only needed a small amount. So, I switched the focus of the search to “lead powder”. I mean, some chemistry lab somewhere would sell the stuff, right? Shortly after I had that idea, however, I realized that lead powder is a fairly nasty substance that I don’t particularly want to breathe in or get all over my fingers.

Fortunately, one of the hits was for tungsten powder, which is quite a bit less toxic, and is used by golf club makers to adjust the weight of golf clubs. I ordered an 8-ounce can of the stuff from Golfsmith, which was on sale for about $16 at the time, and it just arrived today.

Now for some observations. I was extremely pleased to see how finely ground this stuff was. I was expecting to see a pile of coarsely ground and snaggly metal crumbs that looked like iron filings, but this stuff is extremely fine and smooth, in a very dark gray color with just a hint of metallic shine:


The next step was to try it out and see how it worked. I decided to make a paste using a small amount of PVA glue as the binder, so I scrounged up some empty cap to use as a mixing palette, some of my Elmer’s craft glue, and one of my sculpting spatulas:


I squeezed out a blob of PVA glue about the size of a penny into the cap, then spooned in a spatula’s worth of tungsten powder to start the mix. Initially, the mix will be very fluid, like pancake syrup. This is okay, as we want to focus on getting a good initial emulsion first.

Once the mix is an uniform shade of dark grey, add another spatula’s worth of tungsten powder and continue mixing until it thickens to about the consistency of a sticky cookie dough, which is almost where we want it. Next, scrape the blob off the spatula and drop it into the jar of tungsten powder. Give it a good roll around, like you’re coating a sugar cookie. The objective here is to get as much metal into the mix as possible, and to give the glue a bit of time to thicken nicely.

Remove the blob from the jar after the initial sugar-coating, then roll and knead it with your fingers to expose more sticky bits. When the blob feels sticky again, give it another roll around in the powder jar. Repeat until the blob is of an uniform, rubbery, ever-so-slightly tacky consistency like Silly Putty, and it no longer sticks to your fingers in little separate bits and pieces. This is exactly the consistency we want for the next step.

Tear the blob into two pieces, one slightly larger than the other. The bigger of the two goes into the larger concavity in the slottabase, and the smaller one goes in the second concavity. Squish them into place with a clay shaper, sculpting tool, or spatula, making sure the blobs are packed into the slottabase as tightly as possible. This is what you should end up with:

The reason I chose to use PVA as the binder is because it is a naturally flexible and nontoxic substance that dries relatively quickly, and goofs are very easy to clean up before the mix solidifies, and if it dries on your fingers, it’s in a rubbery form that’s easy to just peel off. The PVA-based putty is also very clean and easy to work with. I can’t say the same about stinky 2-part liquid epoxies or cyanoacrylate glue, and I didn’t want to use sculpting putty because I wanted the binder to be a viscous liquid rather than a resinous solid.

Next, I compared a weighted and non-weighted figure to see what kind of stability improvement I could expect. I was pleased to find that the tungsten putty mix lends a significant amount of stability and a little bit of extra heft to the weighted figure, making it much more difficult to knock down or accidentally displace than the unweighted figure.

At $19.99 USD for an 8-ounce quantity, this stuff is not cheap. However, the amount in the jar seems like a lifetime supply considering how little of it was actually used in the process, so I think I can safely do all of the slottabases in my collection and still have plenty of the stuff left over.