Monthly Archives: December 2008

Colonial Marine Conversions: Introduction

Introduction

In this series of posts, I’m going to show you how to convert a bunch of plastic figures into ersatz Colonial Marines like those in “Aliens”. We’re not going to literally make identical likenesses to the characters in Aliens, but we are going to borrow several visual themes from the movie that will make these plastic figures look and feel like Colonial Marines. These conversions started out as one-off prototypes from the Stupid Bitz Tricks series, but were refined and/or revised so that they would be as easy as possible to make with the fewest necessary purchases.

Tools

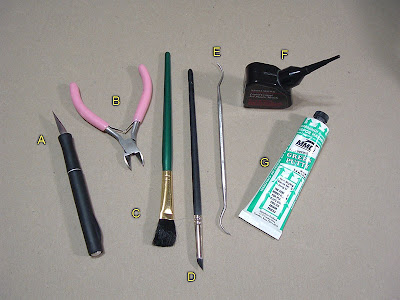
To start with, you should have the following tools to convert the figures. They’ll make your life a lot easier.

  • A: Hobby knife with sharp blades. X-Acto #11 is good. This is your primary tool.
  • B: Sprue nippers. These help get parts off the sprues without damaging them.
  • C: Big paintbrush with thick bristles. Good for brushing plastic crumbs off parts when shaving or cleaning flash.
  • D: Clay shaper. This is a soft-tipped tool, good for knocking off hard-to-reach plastic crumbs or smoothing gap-filling putty.
  • E: Dental pick. This tool is really useful for getting flash out from between fingers and scraping crumbs out of recesses.
  • F: Plastic cement. The bottle in the photo has a metal needle applicator that gives you very good control over where the cement goes.
  • G: Squadron green putty. This stuff is used to fill gaps between parts. Useful if you mess up a cut and have parts that don’t fit flush.
These tools are all cheap, readily available, and will make life a lot easier for you.

Required Sets

You want two boxed sets: the Cadian Shock Troops box, and the Cadian Heavy Weapons Squad box.


These two boxes have enough goodies to make the following items:

  • 2 squad leaders
  • 2 smart gunners
  • 16 riflemen
  • 3 automated sentry guns
  • 2 autoloading mortars
  • 2 plasma gun teams
Extra Bits

You will also need 3 40mm diameter bases for the sentry guns, plus 8 25mm diameter bases for the plasma gun teams and autoloading mortars. You can buy them in bags from Games Workshop or as loose bits from The Warstore.

Optional Bits

If you have 2 Space Marine flamers handy, you can upgrade 2 riflemen to flamer operators.

If you have a couple of Space Marine auspexes handy, you can use them as motion trackers issued to the 2 squad leaders.

Space Marine belt pouches, holsters, and magazine pouches are also useful to have, but are strictly optional.

These Space Marine bitz can be purchased from the Battlewagon Bits department of The Warstore. If you buy the Cadian boxes mentioned above from The Warstore as well, you get a nice 20% discount off the boxed sets.

Another thing you may find useful is a length of thin plastic rod and some sheet styrene. While you can get away with not having these extra items, they are very helpful in further reinforcing the Aliens visual theme. The sheet styrene and rods are sometimes sold under the Gale Force 9 brand in hanging baggies at the local gaming store, but are often way cheaper to buy from hobby stores that sell plastic scale models and whatnot. Look for the Evergreen or Plastruct brands.

The Plan

Over the next several installments of the Colonial Marine Conversions series, I’ll show you how to convert the Cadian plastics, one item at a time. Once all of the conversions have been completed, I will also be posting a painting guide for them with some easy-to-paint color schemes that evoke the look and feel of the Colonial Marine uniforms.

I strongly recommend reading all of the articles first, before doing any of the conversions. This way, mistakes are easier to avoid, as you won’t accidentally destroy a part that you might need in a later conversion. For example, if you cut one leg off all 3 heavy weapon bipods while performing the smart gunner conversion, you won’t be able to build the autoloading mortars, as the mortar conversions assume that you used both legs of one bipod to make the barrels for both smart guns, and that you have 2 intact bipod leg sets left over. So, check all the articles first.

The first conversion article is here, and covers the sentry guns.

Stupid Bitz Tricks #8: Squad Leader

Introduction

I needed a squad leader, and just using the standard sergeant would have been a total cop-out after all the conversion work done on the grunts. Besides, I don’t want a chainsword-waving sergeant…at least not unless my squad is going into battle against an army of homicidal trees. My bitz box yielded a splendiferous abundance of parts that would make the squad leader look like an actual leader, not a superheroic lumberjack with pretensions of being the next Patton.

This is the result:


Construction

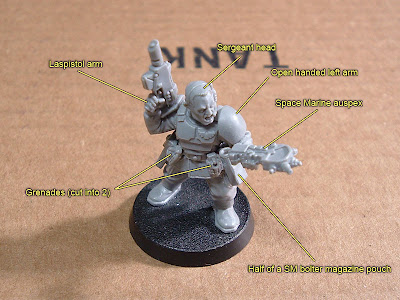
The photos below show the bitz used and their configuration. (Click on each photo to view it at full size.)


Design

I kept the sergeant head because the Shouty Command Face expression and the headset make him look like a seasoned NCO firmly in charge of things. I also kept the laspistol arm, but used one of the open-handed left arms instead of the chainsword arm. I glued a Space Marine auspex into the open hand, which makes a pretty cool “motion tracker” device. Orienting his head in the general direction of the auspex makes him look like he’s barking out orders in response to the tactical picture on its screen.

One thing that annoys me about the Cadian sprues is the lack of holsters for the sergeant’s laspistol, so I swiped a bolt pistol holster from my Space Marine bitz, shaved off the bolt pistol’s grip, then glued that to the squad leader’s belt. I also took a bolter magazine pouch and cut it in half to make a single pouch, and glued that to the left side of his belt in order to visually balance out the large holster. For the finishing touch, I took one of the Cadian grenade pairs, cut it in half so there would be 2 separate grenades, and glued one grenade to each side of his belt. The canteen/ammo pouch/knife bit was glued to the back of the squad leader’s belt.

Conclusions

I like this guy. He looks competent, characterful, confident in his authority, and I suspect that entire forests of plastic trees are breathing a collective sigh of relief at the absence of close combat weapons manufactured by Black & Decker.

While performing this conversion, the motion tracker game mechanics popped into my head. When using this guy in Guncrawl, I’m going to have his motion detector actually grant the ability to use Unknown Contact markers. During the Enemy Phase, UC markers are placed according to the standard enemy placement rules (in the nearest tile out of direct line of sight), and the players then have a tactical picture of where potential hostiles are.

If the squad leader dies or is dragged off by aliens, the ability to use UC markers is lost, and all UC markers on the map are removed. From that point on, a die is rolled for each surviving squad member at the beginning of the Enemy Phase, and the results are checked on the table below:

Ambush Table A
Roll Effect
1 Dragged off! The squad member is dragged through a floor grate or hoisted into a ceiling crawlway by an ambushing xenomorph. Roll on Table B.
2-3 Sneak attack! Place one xenomorph in the closest empty space, on any adjacent corridor or junction tile. The xenomorph acts normally during the Enemy Phase.
4-5 Place one xenomorph using the standard enemy placement rules. The xenomorph acts normally during the Enemy Phase.
6 Nothing happens to this squad member.
Ambush Table B
Roll Effect
1-2 The squad member disappears screaming into the darkness. Remove the model from play.
3-4 Struggle! Roll again on this table immediately.
5-6 Xenomorph loses its grip and disappears into the darkness. The squad member is shaken, but unharmed.

If a squad member rolls a 3-4 on Table B, any friendly models in adjacent spaces will automatically attempt to help free the trapped squad member. Each helper grants a +1 bonus to rolls on Table B, up to a maximum bonus of +3.

Note: These mechanics have not been tested yet, and came to me out of the blue in mid-conversion. Rolling on these tables does not use any actions, and they are meant to be short and dramatic moments that add cinematic flavor to the game.

Stupid Bitz Tricks #7: Face-hugger Prototype

Introduction

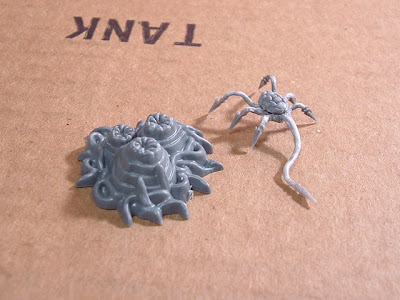
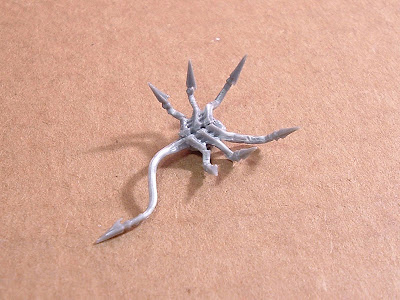
Upon reviewing the Tyranid bitz in my collection, I had an epiphany that would finally allow me to easily turn the adrenal sac bitz into something resembling the face-huggers from Aliens.

This is the result:


Construction

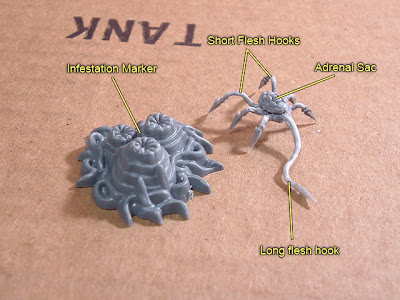
The photo below shows the bitz used and where they go. (Click on the photo to view it at full size.)


Design

The Genestealer boxed set contains 4 infestation markers, which have always looked like eggs to me, and that’s what I used for the face-hugger eggs.

The face-hugger itself is composed of 4 parts: one pair of short Tyranid Warrior flesh hooks, one piece of the long Tyranid Warrior flesh hooks, and an Adrenal Sac bit. The short flesh hooks were carefully bent with a pair of needle nose jeweler’s pliers into something approximating insect legs, and then the side that normally glues to a Tyranid Warrior’s ribcage was shaved flat. The flat ends of the left and right leg sets were then glued together to complete a full set of 6 legs.

The next step was to snip the pointy bit between the two short rear legs, where the left/right sets meet, into a flat surface that the tail could be glued to. The longest of the three flesh hooks on the longer set was carefully sliced off, the end was snipped flat in order to mate up with the leg assembly, and the flesh hook was carefully rolled into a sort of snakey S-shape with the help of a convenient dowel. I also bent it a little in the perpendicular plane so it would sort of droop towards the ground. The reshaped tail was then glued between the rearmost legs.

I snipped off the 6 tubes on the adrenal sac and shaved off the remaining nubs to get a more or less smooth shape around its perimeter. I also shaved down the bottom to make the adrenal sac a little bit more flat, then I glued it to the top of the leg assembly.

Conclusions

2 boxes of Genestealers yields 8 egg clusters and 16 Genestealers to use as xenomorphs, which is plenty for what I have in mind. After the xenomorph conversions, there will be plenty of arm bitz left over for converting. The Tyranid Warriors that the flesh hooks came from will be representing fully grown feral Tyranids, and they will be using the leftover Genestealer arms to replace the ranged weapons.

The face-hugger prototype is pretty rough because I was primarily interested in whether or not it could be done, and I didn’t clean the parts as well as I ordinarily would have. (It was an “Eureka!” thing–20 minutes from start to finish.)

Next time, I’m going to heat the flesh hooks in hot water for 30 seconds before bending them, then I’m gonna stick them in ice water so the shape will take. This will probably simplify the conversion considerably, as it required some fairly delicate bending work at room temperature.

———————-Update!———————-

I forgot to add this to the Conclusions: each box of Warriors yields the following constituent bitz:

  • 3 of the short flesh hooks
  • 3 of the long flesh hooks
  • 3 adrenal sacs

These bitz are enough to make 3 face-huggers. That may not sound like a lot, but that’s actually plenty because of the specific game mechanics I plan to use, and you don’t really need more than 3 to 6 of the things at any given time.

First, only the egg clusters are actually deployed on the table to begin with. The mechanics are set up so that facehugger models are only placed on the table under certain circumstances, which means the number of times that an actual facehugger model is placed on the table is pretty low. (I had the tables all worked out, but I can’t insert them into my blog for some stupid technical reason. I’ll have to post them in PDF format later.)

———————-Update 2———————-


Finally figured out the table thing. Here you go!

Basic Definitions

  • Triggering model: Any model that is within 2 inches of an egg cluster at any point during its movement. The model must stop at that point, and the player rolls on Table A below.

Stats

The facehugger’s stats depend on what game you’re using it in. The basic guidelines below should be applied when you choose the appropriate stats for the game you use this conversion in:

  • Speed: Facehuggers should move at least 6 inches per turn.
  • Toughness/resilience/whatever: Facehuggers are weak, but difficult to hit. If the game you use has a saving roll mechanism or a target difficulty number, give it a good enough value that players will have to shoot at least a few times for an effective hit.
  • Attacking: Facehuggers shouldn’t roll to hit or anything like that. Instead, the thing should mindlessly attempt to move within 2 inches of the nearest model, at which point you can assume it automatically leaps onto that model. Roll on Table C to resolve all attacks made in this manner.

Facehugger encounters should primarily be considered a “map threat” or some form of hazardous terrain encounter, and shouldn’t happen more than two or three times per game, and should ideally be limited to a specific “egg chamber” region of the map. Otherwise, gameplay might be slowed down.

If the triggering model has friends nearby and rolls a 2-4 on Table C, his/her friends can try to help the triggering model. Each friend helping adds a +1 bonus to the next roll on Table C, up to a maximum bonus of +3.

Event Resolution Tables

Face-Hugger Table A
Roll Effect
1 Egg opens! Roll on Table B.
2-4 Egg quivers visibly, and an audible sloshing noise is heard. Roll on this table again, ignoring results of 6.
5 Nothing happens…this time. Triggering model completes its movement as normal.
6 Empty eggs. Remove cluster from table. Triggering model completes its movement as normal.

Face-Hugger Table B
Roll Effect
1 Facehugger explosively erupts from egg and clamps onto the triggering model’s face! Triggering model is now a casualty.
2 Facehugger leaps from egg, but triggering model raises its arms or a weapon just in time to partially block the attack. Roll on Table C.
3-5 Facehugger leaps from egg, but misses the triggering model completely. Place facehugger model anywhere within 1d6 inches of the triggering model.
6 Legs slowly appear one by one at opening of egg. Triggering model may immediately complete its movement or attack.

Face-Hugger Table C
Roll Effect
1 Not good enough! Facehugger finally succeeds in clamping to the triggering model’s face. Triggering model is now a casualty.
2-4 Struggle! Triggering model and facehugger spend the turn grappling. Roll again on this table in the next turn.
5-6 Get off me! Facehugger is thrown off triggering model. Place facehugger model 1d6 inches away from triggering model.

Stupid Bitz Tricks #6: Grenade Launcher

Introduction

I don’t like the grenade launcher that comes in the Cadian boxed set because it looks like something knocked together out of 8-inch PVC pipe for a Halloween costume. However, it’s a very useful bit because the arms can be used for other special weapons, and the grenade launcher itself contributes two important parts to the sentry gun from Stupid Bitz Tricks #2.

One other weapon that I dislike intensely is the Space Marine scout shotgun, which looks funny to me. I also don’t use the bolt pistols and swords with my scouts because I’m not a big fan of the whole “charge each other with oversized powered cutlery” tactical approach, and I’d rather have as many ranged weapons as possible. My scouts also carry bolters and a heavy bolter because they look more like elite commandos that way, which leaves me with a lot of unused shotguns and bolt pistols.

The bolt pistols have targeters and barrel extensions that are useful for conversions, and I also like the ammunition cassettes on Terminator storm bolters. Since there will usually be 2-3 storm bolters left over from a box of Terminators, the ammo cassettes aren’t a hard bit to source. I used those 3 bitz items to prototype a grenade launcher to replace the originals.

This is the result, shown along with the flamer and SAW conversions for scale:


Construction

The photos below show the bitz used and their configuration. (Click on the photos to view them at full size.)


Design

The left hand was shaved off the scout shotgun completely, and that area of the shotgun was also shaved down flush with the rest of the shotgun body. I sliced off everything directly behind the shotgun’s top rail and sanded it flat. The original shotgun barrels were also sliced off completely.

I sliced off the barrel of a scout bolt pistol, making sure to include the little tube above the barrel, and glued that to the front of the shotgun body. I also sliced off the little “flange” at the bottom of the bolt pistol’s magazine and set it aside.

I went through my collection of surplus storm bolters, and settled on one that had a “half-hopper” style box magazine rather than the giant double cassette or the twin banana-style magazines, then carefully cut the magazine off. I had to shave off a little bit of excess, and I also removed some details from the top front and rear of the magazine. This was then glued to the bottom of the shotgun body where the left hand used to be, and the flange from the bolt pistol magazine was glued to the side of the shotgun, above where the magazine meets the shotgun body.

I also sliced off a bolt pistol targeter and mounted it to the left side of the rail on top of the shotgun. (I like offset sights, and it visually balances out the magazine.)

I used the normal grenade launcher left arm with this conversion, and the only change I made to it was to shave off the little peg that fits into the hole on the normal grenade launcher, as the converted grenade launcher doesn’t have a hole for it.

Conclusions

It’s not a particularly exciting conversion visually, but it’s more in proportion with the other converted weapons, and more importantly, it doesn’t annoy my aesthetic sense as much as the original grenade launcher does. I’m also not sure if I like it with that left arm, and I might try using an open left hand with one of the other arms instead, like with the flamer.

I think I’ll be looking through my bitz box for additional detailing to put on the thing, especially on the flat sides. I’ll see how it looks painted first, though.

Stupid Bitz Tricks #5: Fun With Flamers

Introduction

I wanted to add a flamer to my converted Imperial Guard squad, but the standard flamer is much too heavy-looking next to the carbines and squad automatic weapons from Stupid Bitz Tricks #4. I wanted something a bit smaller and more Aliensy in style, so I raided my long-suffering bitz box again.

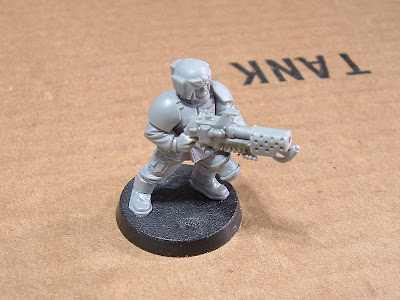
I found a Space Marine flamer, the front half of a Cadian flamer that was cut up to make the smartgun-style heavy stubber in Stupid Bitz Tricks #3, grenade launcher right arms, and some open-handed Cadian left arms. This is the result:


This flamer is smaller and shorter than the normal backpack flamer, and fits in better with the armament of the rest of the squad. The backpack flamer therefore got promoted to a heavy flamer, and certainly looks the part next to the converted flamer:


This conversion is pretty easy, and looks different.

Construction

The photos below show the bitz used and where they go. (Click on the photos to view them at full size.)


Design

The barrels and muzzle of the Space Marine flamer were sliced off where the front handgrip ends. Next, the grip section of the Space Marine flamer was sliced off immediately behind the fuel tank and tubing. The grenade launcher arm was also sliced up so that only the grenade launcher handgrip and the rear section of the grenade launcher remained, and the flamer was glued to that. Next, I sliced off the barrels of the Cadian flamer and shaved the back of the muzzle flat. The muzzle was then glued directly to the front of the Space Marine flamer, completing the weapon.

The hand on the left Cadian flamer arm was sliced off at the wrist, and the same operation was performed on the open-handed left arm. The open left hand was then glued to the wrist of the Cadian flamer arm. That’s all there really is to it.

Conclusions

This flamer fits in nicely with the rest of my converted weapons, although I wish the constituent flamer bits were just a little bit smaller. I also need to clean up some more flash and fuzz from this figure–it’s amazing how many flaws and goofs the camera can pick up!

I plan to use the normal backpack flamers as heavy flamers, because the word “heavy”, when applied to flamers, says to me “shoots more flaming liquid a longer distance”, and not necessarily “bigger than a regular flamer”. Because the much larger backpack fuel tank and the beefier wand definitely do suggest exactly that, it’s perfect for a heavy flamer. It also looks nice next to the bulky heavy stubber.

The converted flamers with the smaller tanks will be gas flamers like the ones in Aliens, and I’m toying with the idea of further differentiating the standard gas flamers and the heavy flamers by having the gas flamers act like jet/spray weapons, while the heavy flamers have a longer-duration incendiary effect represented by placing and removing flame markers that last until the end of the turn.

I think the next time I do this conversion, I’m gonna try making the muzzle shorter and bringing the length of the weapon down a little more.

—————————UPDATE!—————————

I made two more changes to the weapon that made me a lot happier with it visually: I popped off the muzzle and shortened it further, then shaved off the “hook” on the top of the flamer. These changes made it look noticeably smaller, and removing the “hook” made it look less like a Space Marine flamer. Here are the updated photos:


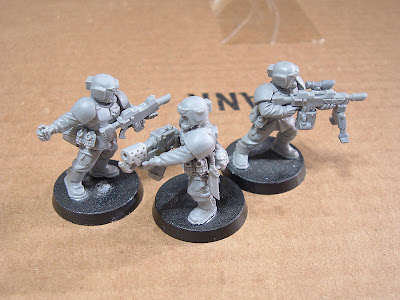
I’m much happier with it now. Yeah, there’s another carbine conversion and another SAW conversion in these photos–I have 5 carbines, 2 SAWs, a flamer, and a squad leader finished now.